Being an amateur gardener I had to draw on my creative skills to design not only the landscape, but also the garden and the garden lights. Nil experience, nil knowledge, so armed with google I was ready to give it a go. I knew I didn’t want to repeat the runway solar lights in the yard across the road, nor invest in $14,000 of Christmas lights like the other house across the road.
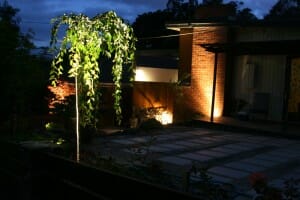
The final result … beautiful garden lights which are well admired, a delight to enjoy every evening from the patio and they also held their own at Christmas being we are in a neighbourhood of lighting fantasy. I love them and others love them too! It’s a blend of fairy garden meets Home Beautiful magazine and every evening I enjoy looking over the patio at the lights or walking through the yard. At the moment the lights are on for less than hour ate dusk but being summer that is quiet late. I am looking forward to winter when the lights will come on at 6pm and I can enjoy them as I arrive home in the evening after work.

These are the neighbours lights … noooooo
So I have put together this novice approach to designing your own garden lighting and hope you can put it to good use. Here are my steps and tips to designing garden lights for the novice with detailed instructions for you to try.
Step 1: Look at lots of pictures on the Internet.
Not of the lights which you buy, but of gardens lit up at night. Collect a variety of images of things that appeal to you – lights on pathways, trees, patios, features, driveways, front door areas, up lights, down lights, strings of lights, high lights, low lights, steps and so on. Select them from grand public gardens, grand homes and hotels and DIY projects.
Use this link to Houzz.com which shows plenty of examples to save onto your ideabook.


Novice tip … ignore the different types of light products at this stage. There are seriously too many options and if you start thinking about these you will never get to your design. Ignore all the options: design, brand, cost, low voltage, color, watts .. the lot! There are so many options, once you have the design in hand then we do the shopping.
Step 2: Draw your garden on some paper to approximate scale.
I love using PowerPoint, being an office bunny I find this very easy to use. You can achieve the same on paper, keep it simple and roughly draw the main ingredients only.

My front yard plan in powerpoint
Start with a scrap of paper and a pen and go outside, pace about the yard giant steps of roughly 1m as you go. Add paths, steps, patios, fence, drive, house, features like rocks or bird-baths, seats and favourite architecture on the house. Then add the main garden foliage: the trees, bushes, low gardens, lawn.
Depending where you live, you may need to do a summer and then a winter version if you have deciduous trees and also if the garden is new think about what it may look like in 5 years time.
Step 3: Time to draw draft Plan-A of your lighting plan
If you are working on paper, try to photocopy your drawing so messing it up later is an option, also get a sheet of clear plastic overhead projector film from the newsagents and a whiteboard marker so you can draw your lights and change them around easily. If working in Powerpoint group all your step 2 garden elements together so you can’t mess them up.
Draw either a circle or semicircle of a lights span where you think you want it to be. Start with a light span of about 1m in diameter on your scale, or less for smaller lights and start to position them on your drawing. You may want one near an unusual tree, or one on each side of the driveway, or a row of smaller ones along the path or over a feature. You can wall-wash against the house to display architecture or need overhead spotlights on gates and doors. Think about where you want ot need light and dont think about what type of light yet.
Novice tips …
- Don’t create an air-plane runway along a path .. far less is better.
- Don’t let light diameters overlap or even touch, dark areas provide far more interest and shadows.
- Look a the photos you collected, how far apart are the lights, what features are they lighting, how much shadow is still in the yard?
On my powerpoint image I created a dark shadow box over the yard drawing so I could see the lights clearly.

My garden lighting plan-A
Step 4: Head outside at night with a strong torch, your partner and Plan-A.
Have very compliant helpful partner be the torch holder, step back and begin testing your plan, one light at a time ..
- Hold the torch low, hold the torch high.
- Where does the circle of light reach?
- What works and take notes, if it is a boring effect .. dump it!
- Be persistent on checking through the whole plan. Then head back indoors and reward your partner with a beer or chocolate.
Step 5: Create Plan-B
In my first plan I had way too many lights, I wanted to uplight every tree, every feature, all the paths and so on. After testing, aim to halve your original plan lol.
- Driveway entrance
- Front door
- Chimney
- Rock wall 1
- Japanese maple
- Norwegian maple
- Steps
- Gate
- Weeping cedar
- Rock wall 2
- Car park bay
- Birdbath
- Christmas tree
Well nearly half!
Now its time to redraw your lighting Plan-B over your garden plan. This time begin to compare each light to your favourite pictures and begin to ask yourself these questions about the direction of the light and remember some degree of variation is good but repetition also works if you want a more formal appearance:
- Up-light or down-light?
- Behind the tree or in front?
- Gentle wall-wash or spot light?
- Small diameter or medium or wide?
- Bright or soft?
So draw Plan-B, head out doors with the torch yet again and check the Plan-B paying more attention to the direction of the light, write down notes and make final adjustments of Plan-B.

My garden lighting Plan-B
Step 6: Looks good so far, but how are you going to do it?
Time to get technical and actually work out how the whole electricity thingo-me-jig will actually work. Ideally with the partner house-man-person in tow, its time to work out these aspects:
1. Low voltage lights require a switch to turn them on or off or a timer so they switch themselves on and off. To have a switch indoors requires electrician and wall renovation, to have a switch outdoors it needs to be handy so you can manually turn it on or off, or have a power point with a timer so you can set and forget. We went the cheap timer option, eventually when we renovate our patio I will have the electrician run power to an indoor switch.
2. Power will need to come from a power point either indoors with a lead which runs outdoors, or a power point already outdoors. Which do you have or prefer? It is not too expensive to have an electrician put an outdoor power point in place for you. We had one external power point on one side of the house but I had another added to the other side so I didn’t ever have to unplug the one we had for other things.
3. Joining the lights requires a continuous cable (0r 2). Can the power then run all around the yard where you planned it without ripping up concrete? I had to abandon the far side of the driveway and position a couple of lights where we can run the power lead.
4. Low voltage lights need a transformer, it’s about the size of thick soft cover book. Where will you screw the transformer, next to the power point or is it further away, will it get wet? You don’t need to access the transformer but it has to go somewhere, ours is under the patio, not too far from the power point and we selected a wet weather variety.
5. And lastly, which lights are attached to your house already? Include them in the plan.
Step 7: Draw Plan-C with your wiring plan
Low voltage lights run n a continuous wire but you can’t really have more than 4-5 on one wire.
Now you know how you are going to wire the power, draw Plan-C which shows the power point, the switch, the transformer and the cabling plan. You may find 1 or 2 lights are just not possible. We considered power points which were outside on either side of the house, we decided on using only one point for the whole front yard, it would have two runs of cable heading in different directions and an outdoor timer.

My garden lighting Plan-C
So with Plan-C in hand it was time to pick the lights. I needed 5 lights, transformer, timer and 50m of cable but that is the subject of my next post:
- Selecting your lights
- Buying your lights
- Installing your lights
- And finally enjoying your lights!
Chat soon
AWAYS THE ARTIST
Dina

Next post: my garden lights